Sunday, October 24, 2010

PE6 - Motion

I spent the afternoon working on several different parts of the Motion lynda.com module. More specifically working with some more of the behaviors and text. As I said in my PE5 posting, I am mostly familiar with LiveType, which focused mostly on text, and putting behaviors onto the font to give it motion. In this final activity, I went forward with it as a culminating creative activity. Please view the 10 second video clip below and then continue reading:


This 10 second clip puts together blending still images together, adding text, using replicators and just because it was cool, giving behavior to objects. The moving rectangles really don't add much to the motion clip other than showing that I know how to do it now. Even though it doesn't really flow with the motion movie I wanted to showcase all the content that I learned this week in Motion.

I will continue with my learning of Motion and complete all the modules as it is something that I can use on a daily basis in my role as my school's contact for the daily news show. It will also prove beneficial when it is time to teach my students how to work within the Motion environment.

PE5 - Motion

Ferris Wheel #3Blurred Motion by SeeMidTN.com via Flickr w/ Creative Commons Licensing
Last night I continued my practical experience learning within Apple's Motion Suite. I'm slowly becoming more familiar with the navigations around the different areas of Motion. As with anything that is new, the main thing is becoming more familiar with where things are located. I am guessing that is where my huge discomfort with using it was, and holding me back at the same time. Amazingly enough, many of the same features I LOVED in LiveType are embedded in Motion, it's just a matter of finding them.

One of the modules that I completed last night was creating shapes within the program. As the tutorial was playing, I was using the exercise files and creating the same bird as Ian the instructor was making in the other window. Using my iPad's Safari on lynda.com has made it easier to listen and watch the movie at the same time. Hrmm....go figure. I'm hitting auditory, visual AND kinesthetic learning all at the same time. 

After we created the bird from scratch, we then gave the bird a colored gradient fill. The ability to change direction and type of gradient is VERY similar, if not the same as, the method employed in Adobe's suites of software. I've only used the gradient tool in Flash and Photoshop, so I can only estimate that they are the same in the others. 

The next chapter I will be learning about is adding behaviors to text and images. This is where the similarities to LiveType will begin to show. And finding where all the features I liked the most will be nice too.

WR4 - Concept Maps

Week 4 Reading Concept Maps


Friday, October 22, 2010

W4 Final Video Option 1

When looking at the three options for the final video, I was pretty set in my head that I was going to choose option 1. With everything that we've done this month for our Action Research Project, I wanted to stray away from using  that as my topic. I was also struck by something that I've heard Chris Lehmann talk about alot on Twitter recently. And that is rather than reform, we should look at education revolution. I know that Sir Ken Robinson has talked about that in a TED talk as well. So that was the thought in my head as I was working on this assignment.


PE4 - Motion

I originally considered continuing on with my Flash CS5 tutorials on lynda.com, but I did want to take a peek at the Motion tutorials to try and get a handle on a program that I use with my school’s daily news show. With Livetype being added into the Motion 4 suite, the learning curve for me has been quite annoying.

Having used Livetype exclusively for my lower 3rd’s and intro sequencing, trying to learn something on the fly has been quite daunting. For this week’s practical experiences, it seems a natural to combine something I need for my professional career with something needed for my educational career as well.

There are so many features in each of the different functions I am very pleased that the Motion instructor Ian takes his time to show each individual feature on every tab. As I have gone through the first 5 videos, I can already see the similarities to some of the tabs in Livetype, which is very nice.

I spent my lunch break today (YAY for teacher workdays and long lunches!!!) finishing up the beginning two Motion modules. At this point I will admit to still being an Apple Newbie. It is quite hard to believe that it has only been 3 years since I made the transformation from PC to Mac. In that time though, it is still nice to see that file management is in my estimation ten times easier. I can only imagine how difficult it would be to add files to the project pane if Motion was PC based.

Now that I’m done with the Introduction and Getting Started modules, next up is working with assets on the timeline and project panes and creating shapes and masks. But that’s for the next PE blog post.

Sunday, October 17, 2010

PE3 - Flash CS5

Ok. Well I will admit it. At this point "I SUCK AT FLASH!" I'm getting a little discouraged with myself as I'm trying to work with the Lasso Tool to section off a piece of a bitmap that I brought into Flash.

Ok, I will take a step back for a second before I go on my rant about my abilities. I did learn something today though. Here is a screen shot of an image that I brought into the flash library. There are 2 ways that you can choose to bring the bitmap image in. I chose to bring it to the stage as it seems silly to add the extra step of importing it into the library and THEN putting it on the stage. Just doesn't make a whole heck of a lot of sense to me to do it that way.

I first tried to use the lasso tool on this image thinking maybe it was just the fact that I was trying to separate out rocky outcropping at the bottom of the image. Every time that I would try to close out the selection it would deselect everything. Really! I am at the point where if I started pulling hair out of the top of my head I would have to get creative on finding spots. This next screen shot shows me at least figuring out how to select the multiple areas in a different image to try and select it. Pay no mind to the line going up to the top left corner as that was necessary for me to start the screen shot selection using Skitch.

Alas though, I will not give up. I have plenty of time tonight to keep playing around with this to figure it out. I will not go any further though in the modules until I do figure it out. Maybe. I hope it doesn't take too long.

BP12 - OMM Wallwisher.com

For this week's OMM I chose to highlight wallwisher.com. Since I did a workshop this week on digital storytelling for the teachers at my school, I wanted to take a step back from all the digital tools that I have at my disposal and take a look at this assignment as if I was one of them. I chose to use powerpoint to create my slides and converted them to .jpg images. I went this route because the lay classroom teacher would not know firsthand to go to creativecommons.org or have an istockphoto.com account to get stock photos to use (unless they were in my workshop this week because I taught them about creativecommons.org!).

I felt their frustration as I was confined to only using the clipart that was in the Microsoft Clip Art Gallery. Was very limiting. I will confess though that I did cheat on the music though. I went to iMovie and grabbed one of the loops and brought it into Animoto. And yes, I chose to use animoto.com again to create my OMM. Why not use something that is a VERY useful tool?

Here's my One Minute Message on wallwisher.com.

AR Reading - Week 3

For Week 3 I chose to not to use mywebspiration.com to create my concept maps. I was sitting in bed and reading my articles. Just seemed a silly thing to log on to the website when I had the full version of the program installed on my computer. Besides, I still like the standalone application alot more than the web based version. Here are the reading concept maps that go along with my reading for this week.


Saturday, October 16, 2010

PE2 - Flash CS5

I'm continuing with my practical experience learning Flash CS5 via the lynda.com tutorials. I'm now through with the third module. Much of what was covered in this third module I'm familiar with already from my experience using Photoshop CS5. Again, I'm very thankful that many of the keyboard shortcuts are the same.


The one thing I did learn tonight though was how to add a outline stroke to an object that either didn't already have one or needing a larger stroke around it in a different color. In this first screen shot I have created a basic merge drawing circle shape with a color fill. There is a small black stroke surrounding it. This is an example of what I learned in modules 1 and 2. It is always good though to review concepts previously learned so it is reinforced.


In this next example screen capture I've added a yellow stroke with a thickness of 22 around the red circle. I've also added yellow brush strokes around the yellow to give it the look of a sun. In the top left hand corner I've created the shape of a cloud using the brush tool. I then used the ink pen tool again to give the shape an outline black color. I then used the paint bucket fill tool to fill in the empty area with a grey color.


At this point, my experience working within Flash CS5 reminds me of using Microsoft Paint. However, I know that when I tried using Photoshop CS3 for the first time I was floored by all the tools that were in the toolbar. I had NO idea what any of them were used for. Much like in this PE experience, the tools that I used in this example were things that I have not used before in the other CS5 programs. Tomorrow's Practical Experience blog post looks to be covering using the timeline and external images. Time to get into the nitty gritty of it. I can't wait!

BP11 - Comment to Michael George

Castro Beans Recipe Card  Downloaded from Flickr with creative commons permission  Photo by: normanack


Please see my comment on Michael George's blog about cooklet 2.0 here: http://proudrooster.blogspot.com/2010/10/bp9-cooklet-web-20-tool.html

BP10 - Comments to Dennis Dill's Blog

Strong Museum of Play, Rochester, NY Photo by: Tom Turner


Please see my comments on Dennis' blog re: Museum Box here.

BP9 - Wallwisher.com

Wallwisher
For week 3's web 2.0 tool I chose to use wallwisher.com (http://www.wallwisher.com). Wallwisher is an online bulletin board that uses 'sticky notes' to leave messages. I was first shown wallwisher last summer from a colleague via Twitter. Much like I am doing now, she had an assignment in her graduate program where she needed to gather people's opinions about an educational topic. I was curious how others felt about their Full Sail experience so far. The above image is taken from the wallwisher that I created to ask our cohort that question. To the 18 people who responded I do thank you for your participation.

I have a friend who has a son who is a low reader and does not like to read books. He told us that he likes reading the wallwishers that she creates about different books. Each sticky note covers a highlight of the plotline of the book. He just explains that it is different reading the sticky notes than a regular book. But in her own special way, she's found a way for her son to enjoy reading.

Wallwisher could also be used to create a different way for students to answer a weekly question. Similar to how teachers who use this type of question in a blogging format. The teacher could pose the question and each student would have to post their answer via a sticky note. The possibilities of collaboration are endless if students are working in collaborative groups. Arranging sticky notes by different topics would give the wallwisher a feel similar to that of a concept map.

Tuesday, October 12, 2010

PE1 - Flash CS5

As I mentioned in my Pre-Practical Experience post earlier today, I'm focusing on my PE for the next two weeks on learning and improving in my use of Flash CS5. I'm using the lynda.com tutorial on Flash CS5 Essentials to facilitate my learning. So as not to have to go from screen to screen on my macbook, I'm using Safari on my iPad to watch the tutorials while at the same time having Flash CS5 open and following along the examples as they are being shown in the video.

This first example is a compilation of my learning through modules 1 and 2. This is my first experience working within the Flash CS5 environment. Going into this experience I thought there would be more similarities to working within the Photoshop CS5 program. The only thing that I've found so far is many of the toolbar features and shortcuts are the same. This will prove invaluable because much of what I do in Photoshop is done through shortcut keys. The things that are displayed in this example are the following toolbar features: Line Tool, Rectangle Tool, Oval Tool, Oval/Rectangle Primitive Tool, Polystar Tool and the Deco Tool.

I've also started on the third module "Moving Beyond the Basic Shapes" tonight while sitting at my son's Cub Scout meeting. I now see the big difference between merge drawing and object drawing. I'll talk about that more in my PE2 posting later this week. My goal is to go through at least 2 to 3 modules per day. That is a very loft goal, as some of the modules are almost an hour long. We shall see if I can maintain that level of commitment. 

PRE PE Blog Post

Flash CS5 by YamilGonzalez from Flickr.
Creative CommonsAttribution-ShareAlike
This week's Practical Experience Assignment is to choose ANY topic/software/web 2.0 tool, research it and become more proficient in it. One of the programs that I've always wanted to become better in is Flash. With having the entire Adobe CS5 Suite installed on our macbooks, what better time than now to work on learning a new program. I know in a week's time I won't become an expert at it, but if I was able to pick up Photoshop CS5 in around a 2 week period I know this will be just as easy!

Sunday, October 10, 2010

Saturday, October 9, 2010

BP8 - OMM "Animoto"

For BP8 I am to create a one minute message (OMM) on one of the web 2.0 tools that I've researched and blogged about during weeks 1 and 2. For this OMM I am choosing Animoto. What better way to do a OMM on Animoto than to create an Animoto slideshow showing off what it can do. 


All the images are stock images from the Animoto image collection. The soundtrack is taken from iMovie. I could not use the sound effect right in iMovie, so I dragged it into garageband and then converted it to a mp3. I was then able to upload it to the Animoto website.

BP7 - Post to Rachael Ullinskey

Part of my Twitter PLN. Screenshot taken from my Twilk.com background.

Please see my comment on Rachael Ullinskey's blogpost about Edmodo.com here: http://rachaelullinskeyetc.blogspot.com/2010/10/bp5.html

BP6 - Comment to Brian Thomas

Working Together Teamwork Puzzle Concept by: lumaxart Downloaded from Flickr
with Creative Commons  Licensing

Please see my comment on Brian Thomas' blog post about wikispaces here: http://briankatiethomas.blogspot.com/2010/10/bp4.html

BP5 - Mywebspiration

Example 1
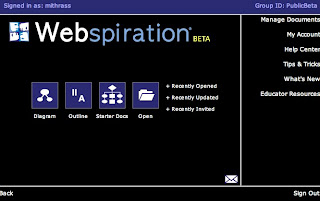
This week's web 2.0 tool review is on mywebspiration.com. For the better part of my ten years of teaching, I've had all of my students learn to effectively use concept mapping to aid in their learning. Because I felt an action research project on the use of concept mapping to be more feasible (and easier to get done in my school) than gaming, it seems pretty logical to do a review on an online concept mapping tool.

There are several web 2.0 concept mapping tools that are out there. Two that come to mind are bubbl.us and lovelycharts.com. In my opinion both of these sites do not come close to the ease of use and functionality of mywebspiration.com. I have always been a huge Inspiration fan. In my role as a technology coordinator, I have seen to it that my school purchased a site license for all of the computers on campus. To make sure that my teachers understood the power of the program I've run several face to face workshops and have created screencast tutorials and have placed them on our community blackboard area. As seen in example 1 above, the window that pops up when creating a new diagram is almost identical to the standalone application. From there the similarities continue.


Example 2
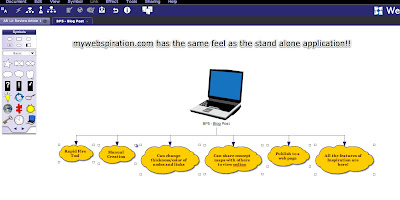
This second screen shot shows a concept map of the features mywebspiration has in common with the standalone application as well (Please click to see a larger image). One of my favorite features of the stand alone application is the Rapid Fire Tool. The RFT (or the Harry Potter Tool with my students) was a quick and easy way for me to quickly gauge my students prior knowledge on particular topics.


Example 3

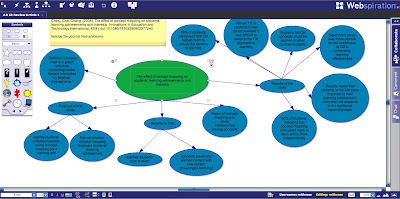
Mywebspiration also gives the user the full ability to customize their concept maps according to their needs. Another thing that I liked to do when creating pre-made concept maps is to vary coloring of my different sub-topics. I modeled this method to my students to help them when creating their own Inspiration diagrams to be able to differentiate easily between different sub-topics.


The one and only complaint that I've been able to find with the online version of webspiration is the inability to change the background color of the diagrams. If the ability to do this is there, I simply have not found it yet. I am very much an anti white background on my Inspiration diagrams. It is more aesthetically pleasing to me when looking at the different links and nodes when they are on a soft toned color background. I choose to do this so that I can hit on my student's Spatial Intelligences.


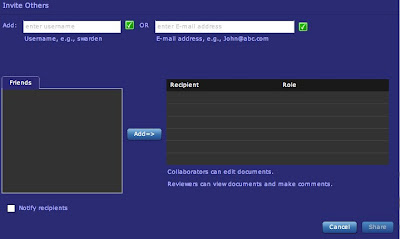
One of my favorite features though of mywebspiration is the ability to share and collaborate content with others easily. In this last screen shot, collaboration in diagram creation can be done very similar to how google docs works. Days of having multiple students hovering over one computer to create concept maps can be a thing of the past. Each student could be hands on in the creation process, while working in collaborative groupings.

Example 4


Monday, October 4, 2010

BP4

For blog post 4 my goal was to research a web 2.0 tool/site and evaluate it. From the moment I saw the assignment I knew which site I would choose.

One of my favorite tools to use is Animoto. To me Animoto is digital storytelling to the extreme. It works similar to iMovie, Windows Movie Maker and Photostory3 with the user uploading images and, if desired, music. Once images are uploaded, the order in which the pictures will be shown can be set. 


After completing the work on images, it is off to choose the music. One thing that Animoto does is work with recording artists that are looking to show off their musical talents. They allow you to choose their music to attach to the videos. If you have copyright free music, or have been granted permission to use music, you are able to upload music to go along with your slideshow. Under the terms of service on the website, Animoto encourages you to use the music that is available through the website if there is ANY question with regards to copyright infringement. 


Once finished with both images and music, you are directed to then give your slideshow a title, ability to change a theme, and give it a title. It is at this point that you are able to create the actual video.


Educational Implications

To many digital storytelling purists, Animoto would probably not interest them at all. If you are a teacher that does not have a lot of time to spend on the creation of digital stories, this site would be for you. It does have its limitations though. Users are not able to provide their own transitions and it would be highly difficult to add personal narration to any of the slideshows that are created. However, living in the I don't like to wait mentality that is our society today, Animoto videos can be created in less than 10 to 15 minutes. The demo video which is below was created in less than 10 minutes. 


Sunday, October 3, 2010

W1 Reading

Week 1 has me continuing the literature review process. Instead of doing a written synopsis of what the article is about, I am choosing to use concept maps to summarize my articles. I am using Webspiration as it is vastly easier to use than the other free concept mapping sites that are out there. Besides, I'm an Inspiration freak. I loved using Inspiration when I was a classroom teacher. For both student use and my use. My wife found it ironic that I'm doing concept maps of journal articles about concept mapping. I also chose webspiration in knowing that I could easily add a Note box and preset up my APA style references right into the concept map.


Article #1

Article #2
Article #3

Article #4